How to add bleed and crop lines in Canva?
Step 1. Starting a design for printing
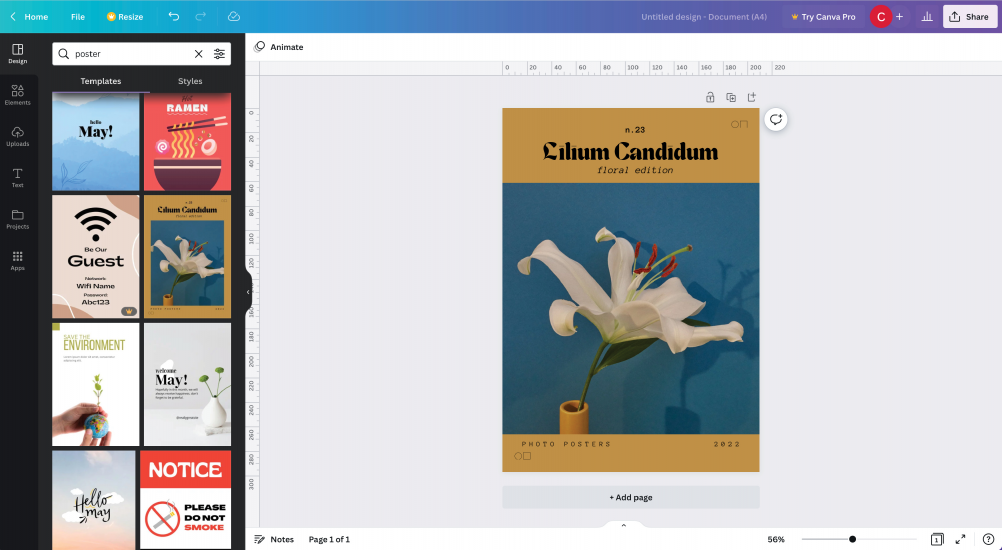
When you start a new design or load a Canva template, it generally shows you just the exact shape and size of the finished item as per the image below. In this example it appears the background colour and the main image go all the way to the edge. However, to create bleed for printing these elements need to stretch past the edge of the document. You can check this in step 2.
Step 2. Checking bleed
Step 3. Extend items into bleed

Step 4. Exporting to print

Step 5. PDF Print settings
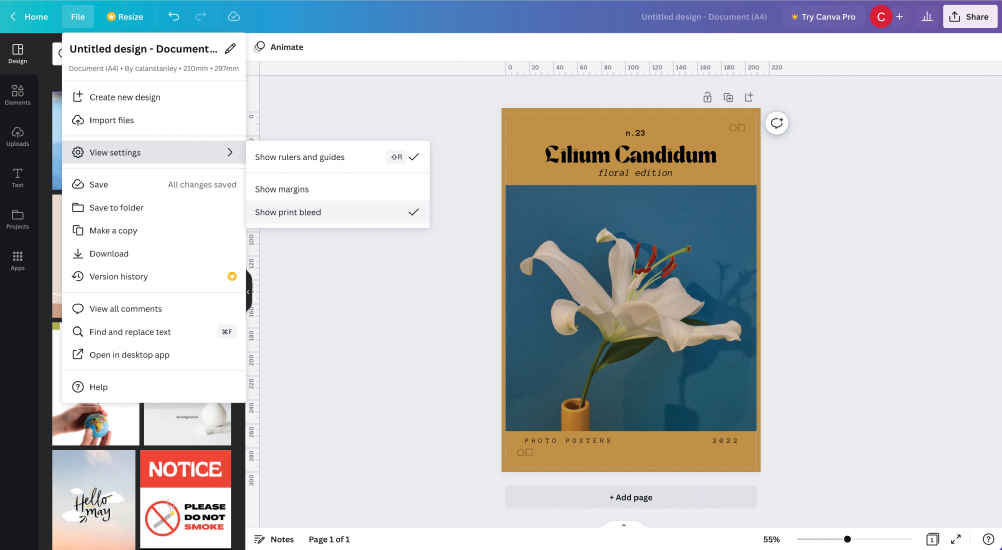
Canva allows you to view the bleed area of documents by selecting File / View settings / Show print bleed from the main menu (see example below). Once this is ticked it will show you the bleed area. In the example below, the background colour extends into bleed however the image stops at the trim edge on the left and right sides. This needs to be extended into the bleed area to be set up correctly for print.
Step 3. Extend items into bleed
To extend items such as images into bleed, simply select the image and then use the corner circles to either increase the overall size of the image box or use the side handles to increase the width or height. In the example below we have stretched the side handles of the image left and right into the bleed area.
Step 4. Exporting to print
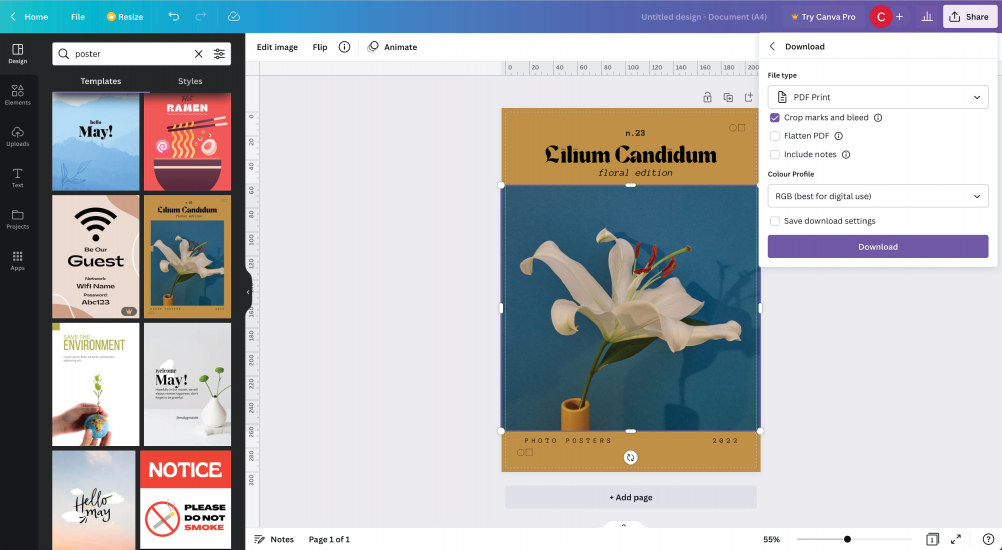
Once you have checked all elements of your design extend into the bleed area, then you are ready to export to print. Canva offer a range of export options. For printing, you need to click the 'Share' button in the top right hand corner and then select 'download' from the menu items. In the download options, select 'PDF Print' for the file type (see below).
Step 5. PDF Print settings
You are then given a few different print settings. Tick 'crop marks and bleed' and keep the colour profile as 'RGB (best for digital use)'. There is now an option to convert from RGB to CMYK in Canva, however for best colour results we suggest leaving files as RGB and PrintTogether can convert professionally in our pre-press process.
Step 6. Download PDF for printing

Finally, click the 'Download' button to download your press ready PDF with bleed and crop lines. If your PDF shows your artwork extending past the crop lines into the bleed area, the file is set up correctly for printing. If any elements stop at the edge in line with the crop lines, then you will need to go back into Canva, extend these elements and download again.
View instant sustainable printing prices online
Once you have downloaded your PDF for print, view our instant sustainable printing prices online 24/7 to have your materials printed.
MORE DETAILS
What is Canva?
Canva is a online design platform used to create designs from pre-made templates. It is a powerful tool that allows you to create visuals for print and digital media such as posters & flyers, cards, websites, social media graphics, and more. It features an intuitive drag-and-drop interface, a library of customisable templates, and a library of over a million photos, illustrations, and icons. With Canva, anyone can create professional-looking designs in minutes, even without any design experience. Files can then be downloaded to print on recycled paper with PrintTogether.
Preparing print files in Canva
There are a number of print products you can design in Canva, such as business cards, postcards and invitations
to just mention a few. As Canva is a global platform a lot of sizes are
setup for a US market. It is advisable when printing in Australia to
double check the size of any templates prior to working on them to
ensure they match the size required.What is bleed and crop lines?
When
designing for print you need to export PDF files with bleed and crop
lines. Bleed is the area outside of the edge of your artwork. Crop lines
are used to indicate where items need to be trimmed. Bleed and crop
lines are required for printing to ensure any background colours, images
or graphics bleed all the way to the edge after trimming. If bleed is
now added you can end up with a none printed line up the end of your
finished prints.